
黑豹 Panther X2 rk3566使用i2c驱动oled屏幕
在购买配件时,无意间看到了.店家售卖的i2c的0.96的oled屏幕,只需要不到7元钱.看到我的x2上也有i2c接口.于是开启了这次的折腾之旅.有兴趣的朋友可以跟着教程一起操作
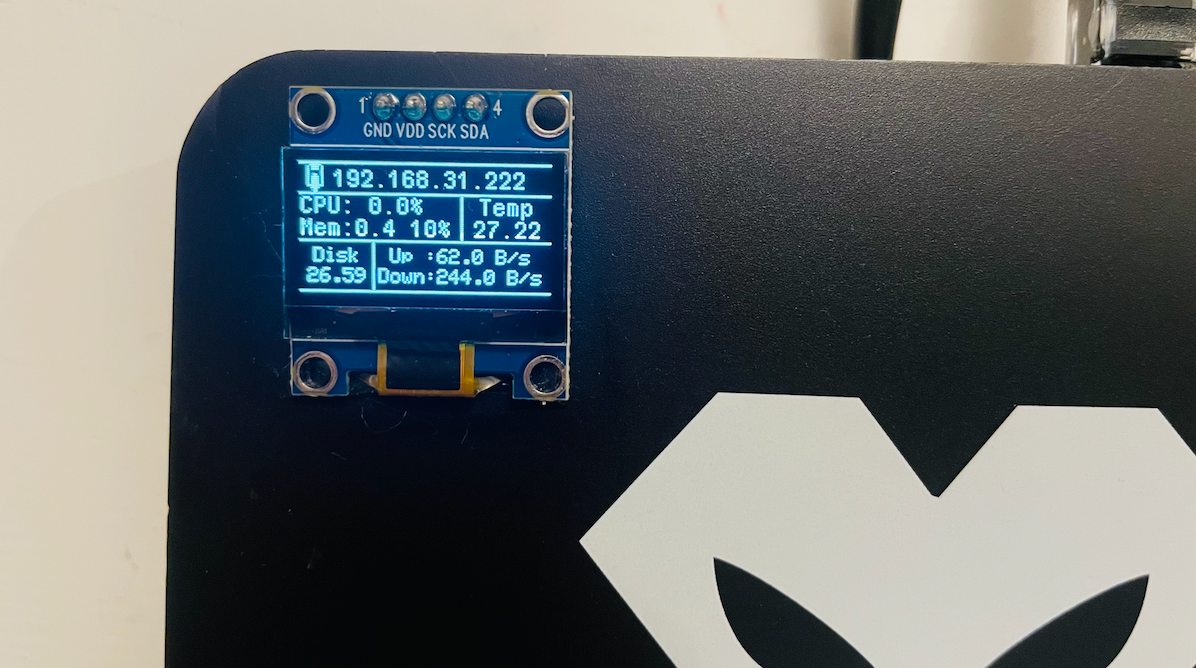
实现效果

一.确认是否可用
x2有两种板型
第一种没有i2c接口,如下图

第二种有i2c接口引出的,如下图,如果你是,这一种的话.那么恭喜你可以跟着教程一起折腾了
二.玩机最第一步 还是固件
大家目前用到的固件的设备树 是没有开启i2c1的节点的.可以自己添加.或者使用我编译的固件
- 固件下载地址:Releases · HelloTheAsia/amlogic-s9xxx-armbian (github.com)
- 刷机教程可以参考:PantherX2(黑豹X2)刷机-如普·Blog (rupu.net)
三.检查设备是否打开 I2C.1
输入下面的命令,如果有显示i2c-1,则已打开
1 | root@armbian:~#ls /dev/i2c* |
四.连接屏幕
连接屏幕切勿带电操作
按照下图连接屏幕与i2c1接口
- 检查屏幕是否连接正常出现 3c 说明连接正常
1
2
3
4
5
6
7
8
9
10
11
12
13
14
15
16更新软件源
apt-get update
安装i2c-tools工具
apt-get install -y i2c-tools
i2cdetect -y 1
0 1 2 3 4 5 6 7 8 9 a b c d e f
00: -- -- -- -- -- -- -- --
10: -- -- -- -- -- -- -- -- -- -- -- -- -- -- -- --
20: -- -- -- -- -- -- -- -- -- -- -- -- -- -- -- --
30: -- -- -- -- -- -- -- -- -- -- -- -- 3c -- -- --
40: -- -- -- -- -- -- -- -- -- -- -- -- -- -- -- --
50: -- -- -- -- -- -- -- -- -- -- -- -- -- -- -- --
60: 60 -- -- -- -- -- -- -- -- -- -- -- -- -- -- --
70: -- -- -- -- -- -- -- --
五.安装wiring驱动库
这里使用orangepi的wiring库,测试下来是可以直接使用的
1 | 更新软件源 |
六.克隆仓库
这里博主根据下面的仓库做了少量的修改
Temperature6/OPi4_RTDevInfo: 适用于OrangePi4LTS的CPU信息显示小屏扩展板和代码 (github.com)
1 | 克隆源代码 |
七.设置开机自启
博主这里使用的是systemd的方式
1 | 新建systemd文件 |
最后
博主本来想找个做3d打印的为这个屏幕找个合适的位置安放.在海鲜市场找到了casatift店家,老哥也是个热爱折腾,喜欢智能家居的玩家,很爽快的答应,随即就开始了修改模型.最终效果如下

大家有兴趣的也可以去查看他的3d外壳,质量很好也很精致,同时casatift也分享了他制作的模型,有3d打印机的朋友可以自行打印:https://makerworld.com/zh/models/395574#profileId-296880
参考资料
本博客所有文章除特别声明外,均采用 CC BY-NC-SA 4.0 许可协议。转载请注明来自 HiAsia的小站!
评论